Colorado Motocross Magazine Training Tips
Plyometric Medicine Ball Push Ups
The medicine ball Plyometric push up is an explosive movement and can take some time to master, but once you have the physical tools necessary to do the exercise, it should become a staple in all MX athletes’ training programs. Plyometric exercises increase explosive power. This push up over a medicine ball develops both upper body explosive power and increases your force production capability. Increased muscular power production is essential for MX athletes, primarily to help a rider stay centered on the bike or to help prevent them from crashing when they get out of shape. When we racers do get out of shape in a particular section, we will call on these explosive muscle fibers to help us get the bike back under control. If you do not develop, those fibers you have a greater chance of crashing and injuring yourself.
Let’s first begin with a self evaluation to determine if you are ready to try this exercise.
TEST 1: Drop down and do three sets of thirty push ups in a five minute period. These must be good, clean push ups. No going down only halfway or dropping your hips to where you look like a swayback horse. Be honest with yourself, or have a partner there to keep you honest. If you are able to complete the three sets within five minutes, then chances are you are ready to try the Plyometric push ups. Just to be on the safe side though, I want you to try one more test.
TEST 2: This test will ensure that you have good enough shoulder stability to try the Plyometric push ups. For this test, you are going to do push ups on a medicine ball, but you are not going to explode over the ball side to side. Instead, you are just going to isolate one side of your body. Look at the first picture in the sequence to the right. This will be your starting position. You should have one hand placed securely on the ball and one hand on the floor. Your body should be aligned in a basic push up position. Now lower your body as if you were doing a push up until your face is about six inches from the floor, then return to the starting position. Do not move the ball. If you feel wobbly on the ball that is pretty normal for the first time. But if you feel as though all the pressure is on your shoulder, and something is pinching or grinding, you probably need to start with a more basic strength program and work your way up to this exercise. For those of you who feel solid with the movement, go ahead and continue on doing ten repetitions on each side of your body. If you can perform three sets of this movement within an eight minute period, I would have to say you are ready.
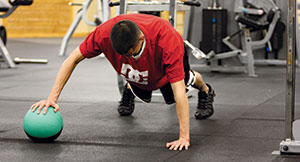
STARTING POSITION:
Get into a push up position with one hand on the medicine ball and your other hand on floor. Make sure to keep your core tight and do not sag at the hips.
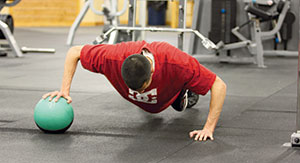
PROCEDURE:
Lower your chest toward the floor.
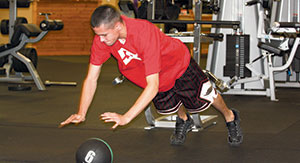
When your face is approximately four-to-six inches from the ground, drive your body up and over the ball explosively so your hands leave the ground and ball. Do not move the ball. Your body should be the only thing that is moving.
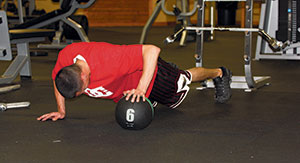
Land with your opposite hand on the medicine ball and repeat for twenty repetitions, or until you can do no more.
COACHING KEYS: Keep your core tight to stabilize your body before starting. Keep your body in a straight line and do not move the ball.
WHEN TO USE: This is a great way to begin and end a total body strength training circuit. Integrate this exercise two times a week into your normal training routine.